In this Star Wars: Squadrons Fleet Battles guide:
Star Wars: Squadrons Fleet Battles overview Capital Ship subsystems explained (with diagrams!) How to win Fleet Battles quickly
Star Wars: Squadrons Fleet Battles overview
Fleet Battles in Star Wars: Squadrons are pretty complex, and it’s easy to feel lost and have no idea what’s going on when you’re fighting in one. Let’s go over how Fleet Battles work as clearly as possible.
Objectives and Capital Ships
Fleet Battles is a 5v5 game mode. Each squad of 5 is supported by numerous AI starfighters, along with three Capital Ships each. One of these Capital Ships is the Flagship of each team, and if it is destroyed the game is over and the opposing side wins. The smaller enemy Capital Ships (Frigates for the Republic, Cruisers for the Empire) must first be destroyed before the Flagship can be targeted. Your squad isn’t alone when fighting these Capital Ships: whenever your team tips the scales and goes on the offensive, you’ll be joined by a large ship (not quite Capital Ship size, but still pretty giant) which automatically attacks the nearest enemy Capital Ship. These attacking ships are called Corvettes (for the Republic) and Raiders (for the Empire). As defenders, destroying a Corvette or Raider will grant you a big Morale boost.
Morale, Attack and Defence
A match will dynamically adjust between different phases of attack and defence based on each team’s Morale. Killing enemies earns Morale, while losing ships will cost Morale. If a team fills up the Morale Bar at the top of the screen, then the phase of the battle will change. If you were previously defending, you’ll now be attacking - and vice versa. A Fleet Battle always starts with a Dogfight in the centre of the map. Win that dogfight to get the chance to attack the two enemy Frigates/Cruisers. Once they’re both destroyed, the Flagship can be attacked. Capital Ships don’t respawn: once they’re destroyed, they’re never coming back. If both Capital Ships on a side are destroyed, then the other side’s Capital Ships will advance, closing the gap. If both sides’ smaller Capital Ships are destroyed, then the two Flagships will get close enough together that they’ll actually start firing directly at one another.
How to keep track of what’s happening
The current state of the battle can be viewed at any time by opening the menu and viewing the map. Wherever the Front Line is, that’s the current objective, and it will show who is attacking and who is defending. The other key thing to check constantly in Fleet Battles is the Morale bar at the top of the screen. Not only will it tell you the current phase and objective of the battle, but it will also warn you when the tides are about to turn. This is very important, because Capital Ships are far, far more powerful when behind the front line than when they’re on the front line. So if you’re busy attacking a Capital Ship, and suddenly the battle shifts and your team is on the defensive, and you’re caught beyond the front line, then you’ll almost certainly be torn apart. To summarise: earn Morale by getting kills and staying alive, defeat the enemy Capital Ships and then the Flagship, keep checking your Morale Bar and the map to make sure you’re not caught beyond the Front Line.
Capital Ship subsystems explained (with diagrams!)
The Flagship of each fleet is a gigantic spacecraft with far more health and shields than the smaller Capital Ships on each side. Like Corvettes, Raiders, Frigates, and Cruisers, the Flagships are covered with turrets and are protected by hardy shields - but they differ from the smaller vessels in two ways:
Flagship shields can regenerate, while smaller Capital Ship shields are destroyed permanently the first time they are disabled. Flagships have access to four unique subsystems: Shield Generators, the Targeting System, the Power System, and the Tractor Beams.
These subsystems can be individually targeted and destroyed to make the Flagship more vulnerable in specific ways. Here’s what happens when you bring down each subsystem:
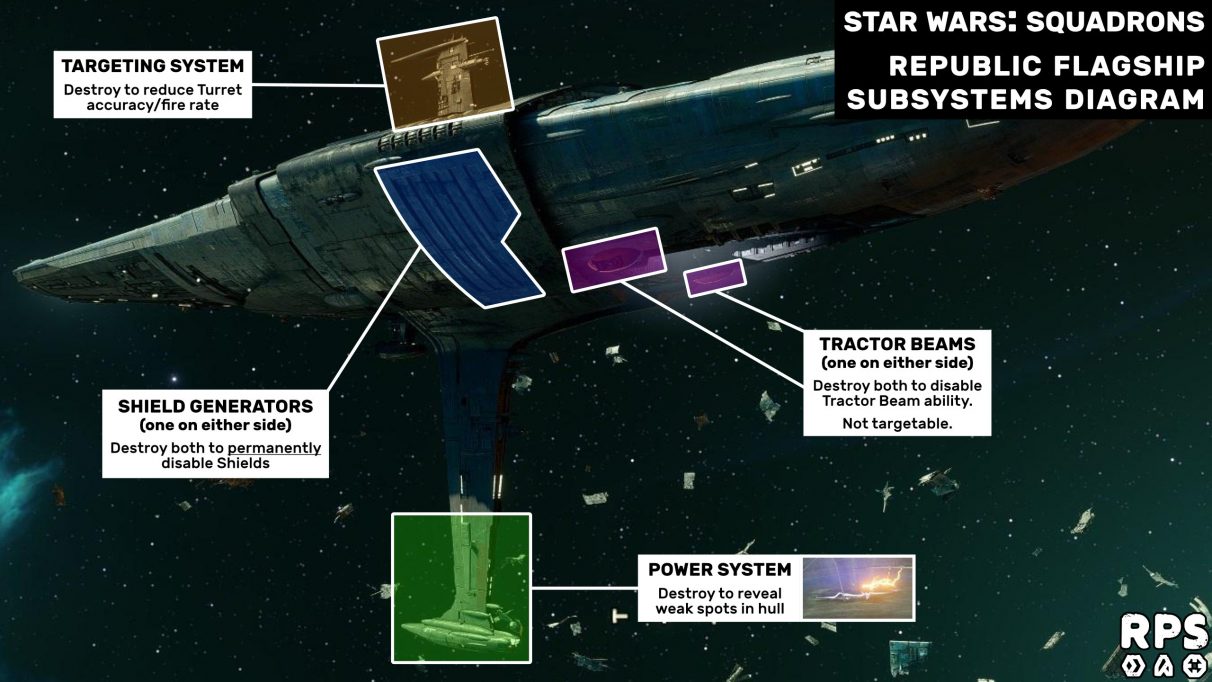
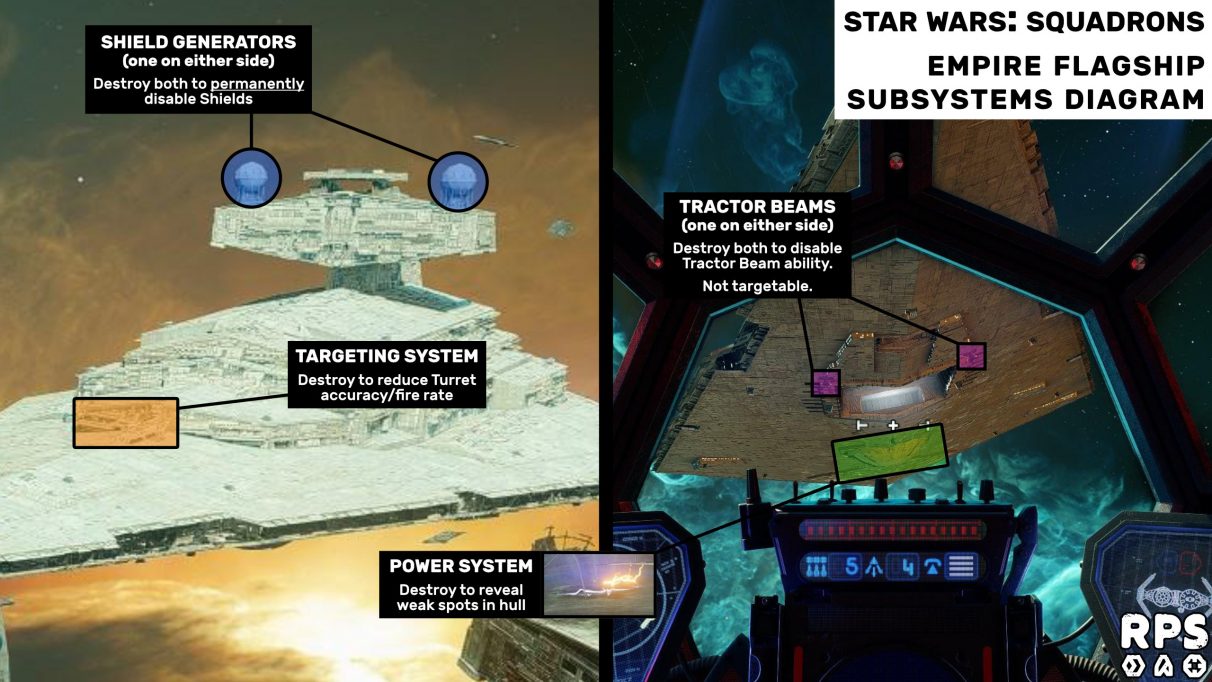
Shield Generators. Destroy both Shield Generators to permanently disable Shields. Targeting System. Destroy to reduce the accuracy and fire rate of the Flagship’s many turrets. Power System. Destroy to reveal weak spots across the ship hull which deal major damage when targeted. These weak spots look like blue electrical cracks in the hull. See the below diagrams for an example. Tractor Beam. Destroy both Tractor Beam emitters to permanently disable the Tractor Beam ability. This is the one subsystem which, inexplicably, is not targetable when using the Targeting Wheel to cycle through Flagship subsystems.
Below is an annotated screenshot of the various subsystems of the MC75, the Republic Flagship:
Here is a similar diagram illustrating the locations of the same subsystems on the Empire’s Flagship, the Star Destroyer:
While it is possible to bring down a Flagship through brute force and damage without any care towards the subsystems, targeting those subsystems will give your squad a far easier time attempting to win the match. There are no hard rules on the order in which you should target these subsystems, but I’ve found great success with the following strategy: By the time you’ve destroyed every subsystem, the Flagship’s health should be pitifully low, and a final bombing run is often enough to take it out completely and win the match for your squad.
How to win Fleet Battles quickly
Now let’s go through a few key tips and tricks on how to win Fleet Battles in Star Wars: Squadrons quickly and decisively.
Good team composition is key. Bombing runs should (obviously) be run primarily by Bombers, but also Support craft to repair and restock the bombers, and a Fighter-class ship or two to help combat the enemy squad. While on the defence, a higher number of Interceptor-class ships is important, but there’s also room for Bombers that focus down the enemy’s Corvette/Raider ship to help swing morale in your favour. Use the best anti-Capital Ship loadouts. While our Best Star Wars: Squadrons loadouts page focuses primarily on loadouts for dogfights, they are not ideal when facing Capital Ships. I rotate between two ships for my Capital Ship attacks: a Support-class ship with access to Ion Torpedos (which deals colossal damage against Capital Ship shields from a safe range); and a Bomber equipped with a Laser Beam, Proton Bombs, and a Reinforced Hull to quickly take out subsystems. Use the Targeting Wheel to target subsystems. You can hold down your Target button to bring up the Targeting Wheel. Use this wheel to exclusively target Flagship systems, and ping them for your team to help coordinate your attacks. Bear in mind, however, that the Tractor Beam emitters cannot be targeted in this manner (for some bizarre reason). You can use Ion damage to temporarily disable subsystems. Ion damage deals little hull damage, but it shreds shields and it also temporarily disables subsystems. You can use a ship with Ion weaponry to temporarily disable a flagship’s Targeting System or Shield Generators. They’ll come back online eventually, but it gives you more than enough time to capitalise.
That’s everything you need to know about winning Fleet Battles in Squadrons - but if you’re after more handy tips and strategies, be sure to check out our Star Wars: Squadrons tips page!